
Blender Chapter 2: Things to Avoid When Starting Out
If you haven’t checked out Blender Chapter 1: Introduction. You should first check that out before reading this. Chapter 1, talks about the basics of the Blender and its functionalities. Chapter 1: Introduction to Blender

Knowing how the basic interface and hotkeys, which you’ll familiarize yourself with practice, is good to get you started, but during your modeling journey, you are sure to run into situations where you are not sure why your models look…off.
The solution to these problems may lie with the knowledge and good habits that you should integrate into your everyday modeling practice when starting out.
Here are some common good habits to build in Blender:
Applying your transform:
Whenever you manipulate the location, scale, or rotation, an issue comes up where the objects visuals/modeling of the object you are affecting do not quite behave as you intend.
This is because any modifiers or tools you add to that object are directly affected by your transform (location, scale, rotation).
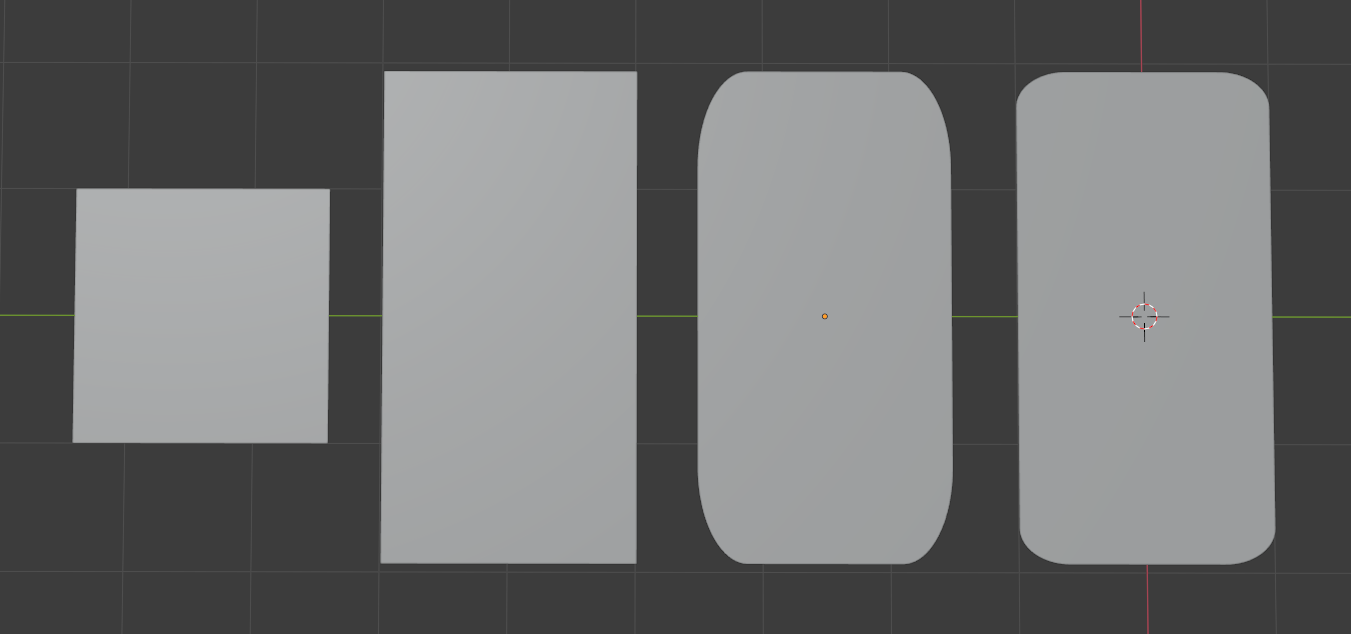
For example, let’s say you have a square plane, and you scale the plane horizontally on the x-axis, thus creating a rectangle. Now let’s say you want to add a bevel to curve the edges of that rectangle so its shape would look something akin to an I-phone. However, when you add the bevel you notice that it doesn’t curve the edges to round out the 4 corners to create that I-phone look. Instead, it ends up getting more and more “oval” like.
This is because the bevel is being directly affected by the scale that was applied to the original square. Instead of beveling a rectangle, you are actually beveling a stretched square scaled to look like a rectangle.
To fix this you apply the transform, which essentially resets all the scaling, location, and rotation to zero values, telling the object that is being modified to become what you see it as, which is an actual rectangle, and not a stretched square. This time, when you apply a bevel to smooth out the corners, it will actually smooth it out evenly, and voila, you have your I-phone shape.
From left to right: Square, Rectangle/Stretched Square, Stretched Square w/ Bevel Modifier attached, Rectangle (AKA stretched square after Applying Transform) w/ Bevel Modifier
Avoid Improper N-gons:
Another good rule of thumb is to avoid using shapes other than quadrilaterals (4-sided planes like rectangles) and triangles (when appropriate), unless confident in your use of more advanced geometry.
However, if you tamper with geometry, there has to be a consistency about it so that when you edit it, the geometry doesn’t go haywire in ways you didn’t expect.
Let’s take a cylinder for example. The tops and bottoms of a cylinder are circles and the two circles are bridged together to create that soda-can-esque shape. Now let’s say you want to use this cylinder to make a pencil. Well, to do that, you would need extra geometry added at the top of the cylinder in order to mold it into a cone-like shape with a point at the top to act as the pencil head.
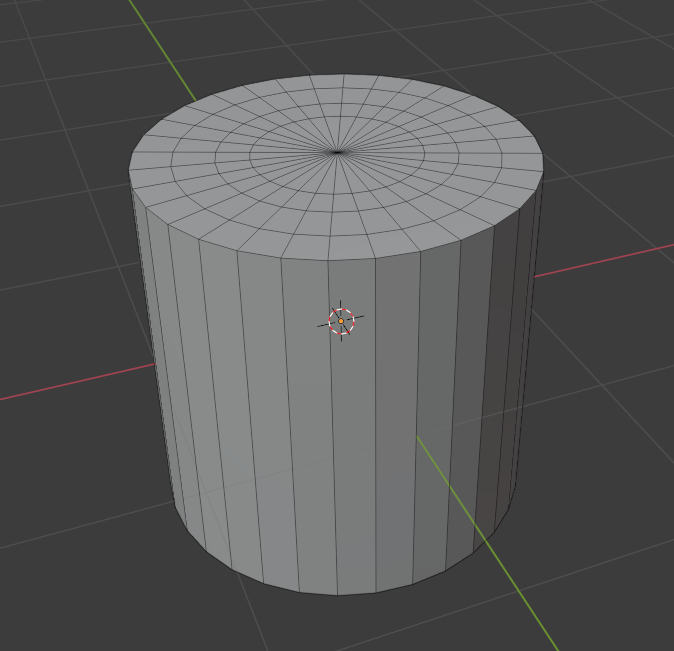
This top circle would thus have to consist of various polygons (n-gons), which could be anything from a triangle to an octagon or more. But no matter which n-gon you use, know that a circle doesn’t magically turn into a cone because you will it to.
It needs the right type and number of n-gons inside that circle, which you can essentially pull up from the center and create the cone shape that you seek. The question is: Which shape is the best for this? Well, let’s use squares and rectangles only for example (quads). This is the wrong shape, but it’s good to explain why it’s the wrong shape here. If the circle on top is made up of only rectangles and squares, this means as you continue including quads near the edges of the circle, you’ll certainly have to have triangles at some point because there is physically no space near the edges of the circle to allow for a 4-sided shape. This inconsistent geometry usage will cause a lot of weird things to occur.

Let’s say you had an invisible hand pull from the center of the circle to create the pencil point. As you drag the geometry up, consisting of the various quads and triangles I mentioned above, the modeling mesh will attempt its best to create that cone-like pencil head, but the cone will end up inconsistently lopsided because the shapes and use of geometry we used were inconsistent and asymmetrical. There is no “center” point in the top circle to create the pencil head from because the squares and rectangles do not create a symmetrical and consistent topology. Dragging it upwards will only result in an “almost”-cone shape that has multiple bumps, grooves, and other asymmetry resulting from the various shapes trying to mold itself into a cone.
Instead, the top circle should only be consisted of triangles focusing in on a center point, with some supporting quads encircling the triangles at the center, so when the invisible hand drags the shape upwards, it would actually pull directly from the center point and drag the triangles and quads to form the pencil shape you see below. You can tell just by looking at it that this symmetrical use of quads and triangles with the focus at the center is what keeps this pencil head consistent. Using a chessboard pattern of quads wouldn’t be able to achieve the same results. You’re more likely to get a mountain shape than a pencil head shape using that kind of method.
In short, use the right type and number of geometry and use it consistently throughout your models. Good topology usually focuses on triangles and quads, and never exceeds that unless you are confident in your use of other n-gons such as hexagons, octagons, etc. Common sense and getting used to knowing which shapes work where is the key to avoiding mistakes later down the line.