
Face Recognition Attendance System is an attendance system based on face recognition which automatically marks the attendance of the present employee on recognizing the face of an employee. Over the past years, attendance was done by calling the names or by signing the signature on the attendance paper. As time gradually passes the new way of keeping attendance records of staff has been shifted to the technology that uses biometric which requires eye, face, or fingerprint as user input. Among all other biometrics, Face recognition is an ongoing research topic in the field of computer vision and is widely adopted due to its contactless process.
Every day, we look into our phones thousands of times and end up using face recognition technology for unlocking our phones. Facebook uses its own face recognition algorithm for recognizing you and your friends. China has created a vast surveillance system equipped with facial recognition technology to monitor its citizens. Similarly, the FBI uses facial recognition to spot criminals.
But the question is “Have you ever taken a closer look at how face recognition works?” If no, don’t worry. In this post we are going to reveal how it works and build one for us for automating the attendance process.
So, Let’s get started with the introduction….
Table of Contents:
- What is Face Recognition?
- How Face Recognition Works?
- Inspiration For Building This System
- Smart Attendance System
- FAQ
Looking for the source code to this post? Get the code on Github
What is Face Recognition?
Face Recognition is a method of identifying an individual by comparing their faces with the stored faces in the database. Imagine you own an Iphone and you want to use Faceid to unlock your phone. First, you need to setup your faceid by capturing your face image at all possible angles. Then the system stores those faces in a database and finally, it recognizes you and unlocks your phone by comparing your faces with the stored faces in the database.
After understanding the definition of face recognition, now the questions may arise how this technology works and how is it able to recognize the face belonging to a particular person. For knowing things in detail, let’s dive deep into the algorithm used in the face recognition process.
How Face Recognition Works?
Well, face recognition systems are in the rapid development phase and are accumulated with a new strong algorithm that improves the system day by day. With advancements in deep learning and computer vision, face recognition technology has gained much popularity over the years. Many researchers have come out with new deep learning architectures to significantly improve the performance of face recognition algorithms. However, among all other algorithms, FaceNet is one of them which achieves state-of-the-art results on a range of face recognition benchmark datasets.
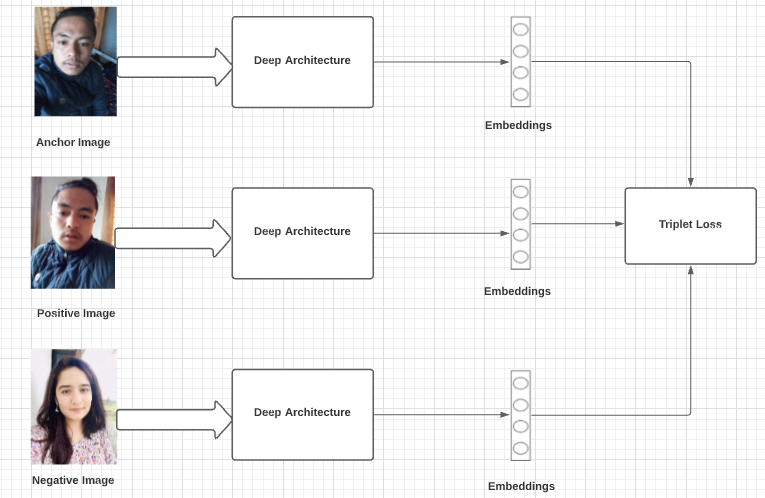
FaceNet is the name of the facial recognition algorithm that was proposed by Google Researchers in 2015 in the paper titled“ FaceNet: A Unified Embedding for Face Recognition and Clustering”. They proposed an approach in which it maps each face image into 128-d feature vectors such that the image of the person will be placed closer to all other images of the same person as compared to images of any other person present in the dataset. The main difference between FaceNet and other techniques is that it learns the mapping from the images and creates embeddings rather than using any bottleneck layer for recognition or verification tasks. It used a method called triplet loss as a loss function to do so. Let’s take a look at the architecture of FaceNet algorithm.
These deep learning models output a 128 dimensions embedding of an image with L2 normalization performed on it. These embeddings are then passed into the loss function to calculate the loss. The goal of this loss function is to make the squared distance between two embeddings of the same identity small, whereas the squared distance between two embeddings of different identity large. Therefore a new loss function called Triplet loss is used.
The intuition behind the triplet loss function is that we want our anchor image(image of a specific person A) to be closer to positive images(all the images of person A) as compared to negative images (all other images). In other words, we can say that we want the distances between the embedding of our anchor image and the embeddings of our positive images to be lesser as compared to the distances between embeddings of our anchor image and embeddings of our negative images.
Triplet loss function can be formally defined as:
Here f(x) takes x as an input and returns a 128-dimensional vector, i denotes i’th input and the subscript a denotes Anchor image, p denotes Positive image and n denotes Negative image.
Now, we get an idea of how face recognition works. So, let’s give it a try to build a system to automate the attendance process using face recognition.
Inspiration For Building This System
Traditional methods of attendance are time and effort-consuming. In big organizations where many staff are employed, it’s hard to perform attendance manually and there may be chances of misplacement of attendance sheets leading to inaccurate and inefficient attendance. Employees can easily get rid of time recording options by committing time theft in manual-based attendance systems. So, by observing these kinds of problems, I got inspired to build a system “Smart Attendance System” which not only automates the attendance process but also prevents the employee from committing time thefts.
Smart Attendance System
Smart Attendance System is a system that automatically marks the attendance of a present employee by recognizing the face of an employee. Besides that, it also records the date and time at which the employee interacts with the system.
For a complete understanding of how the Smart Attendance System works, see this video.
Smart Attendance System Project Structure
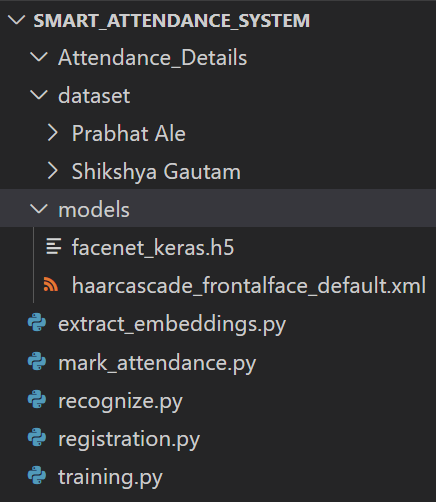
Our system has three top level directories :
- Attendance_Details/ : It is an empty directory at the beginning and finally the attendance report is stored in .csv format inside this directory after attendance marking.
- dataset/ : Contains face images for two subjects organized into subdirectories based on their respective names. Each subdirectory contains 50 face images. New subdirectory is added based on the name provided by the user as an input during the registration process and their 50 portrait faces are stored inside that subdirectory.
- models/ : contains pretrained model files for face detection algorithm and face recognition algorithm. ‘facenet_keras.h5’ is a pretrained facenet model whereas other is the opencv’s haarcascade classifier.
We also have five main files in the root directory:
- registration.py : takes the user portrait face and stores them in dataset directory based on the name provided by the user.
- extract_embeddings.py : 128-d facial embeddings are created with this script.
- training.py : training script to create a recognizer model by training SVM algorithm on feature vectors and labels.
- mark_attendance.py : script to create a csv file which can store date, name, time and attendance status of an employee.
- recognize.py : recognizes the identity of staff and automatically mark their attendance as present.
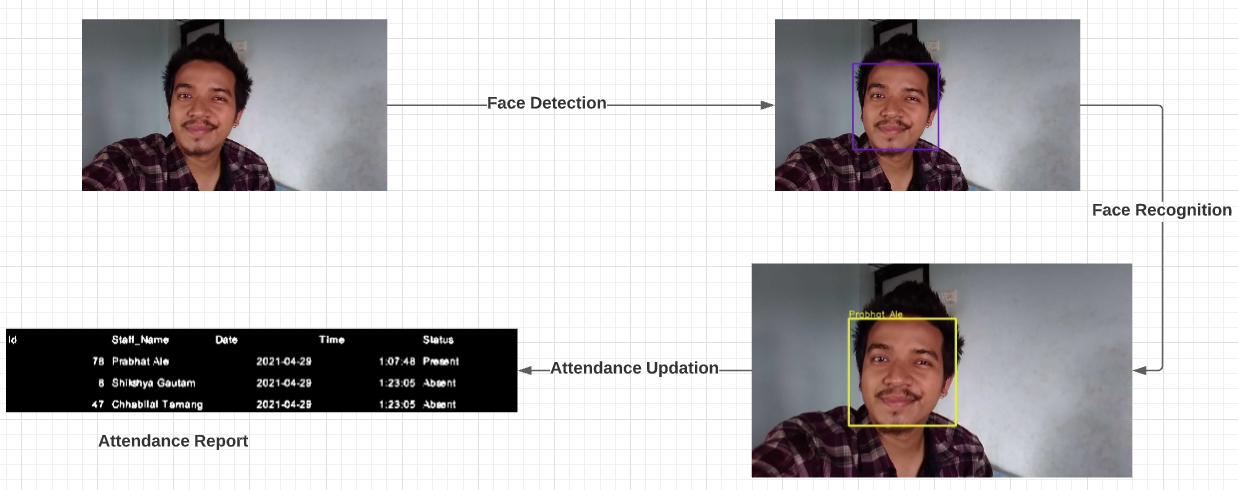
How Smart Attendance System Works?
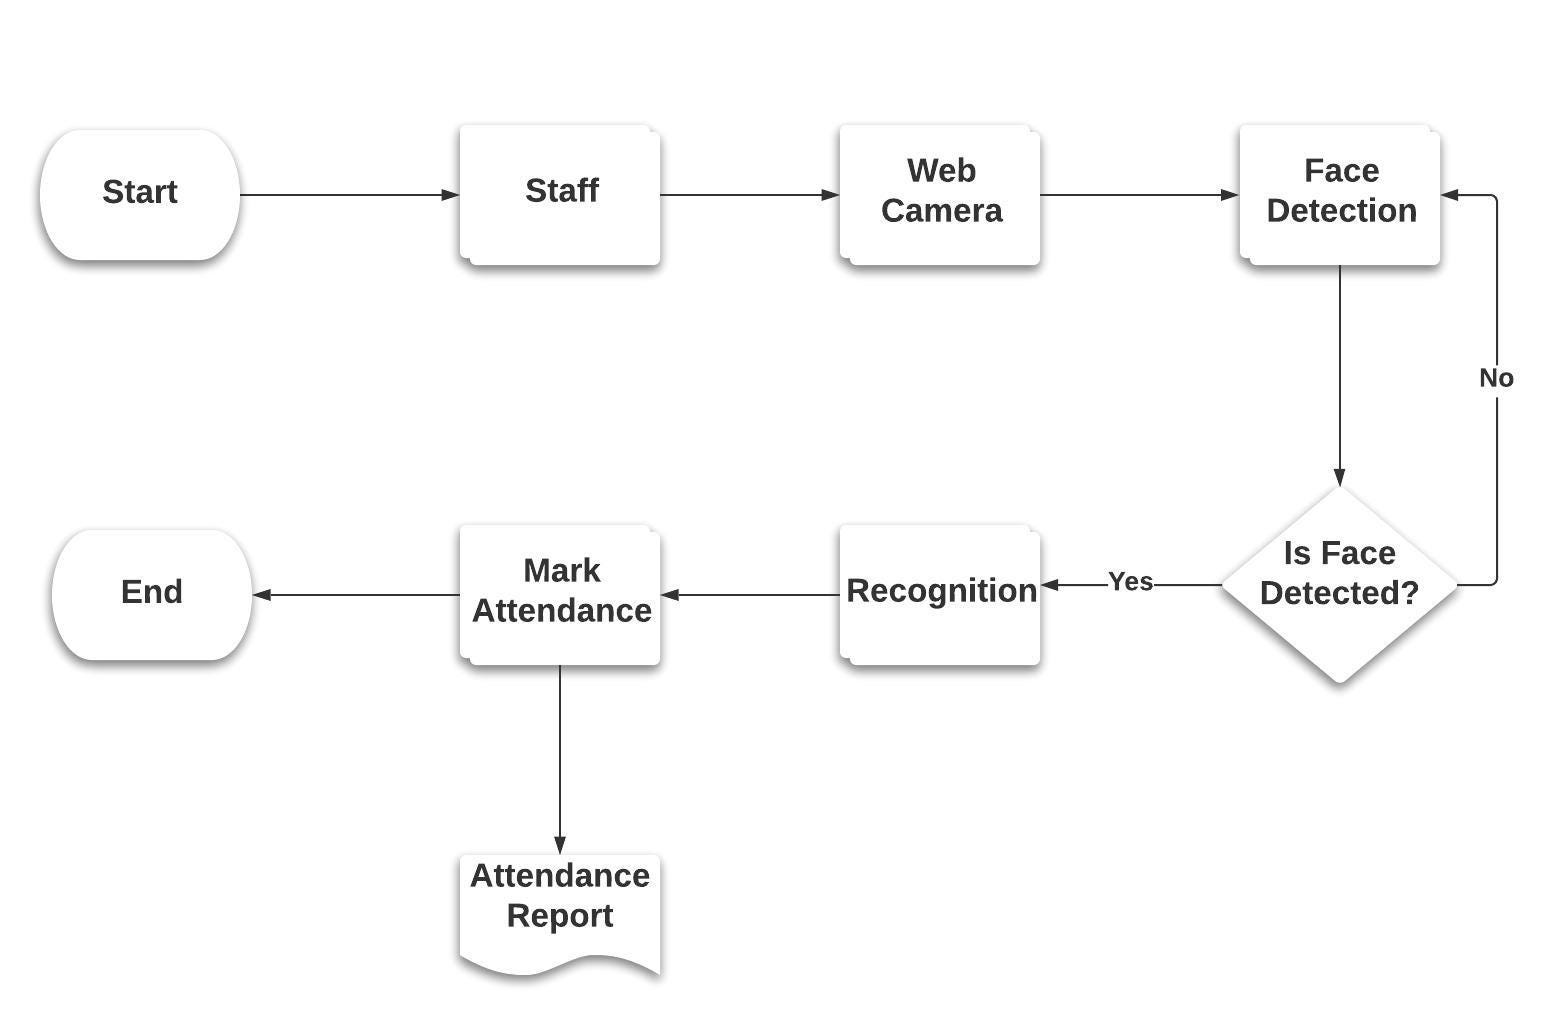
Smart Attendance System had to go through three phases :- Registration phase, Training phase and Testing phase.
In the registration phase, the system had to take in user inputs and make use of a camera sensor i.e webcam to gather the training datasets. The camera accepts the facial inputs from the staff and the Viola-Jones algorithm detects the facial region from the captured frames of each staff. Then the detected faces are stored in a separate folder which makes the training datasets which completes our registration process.
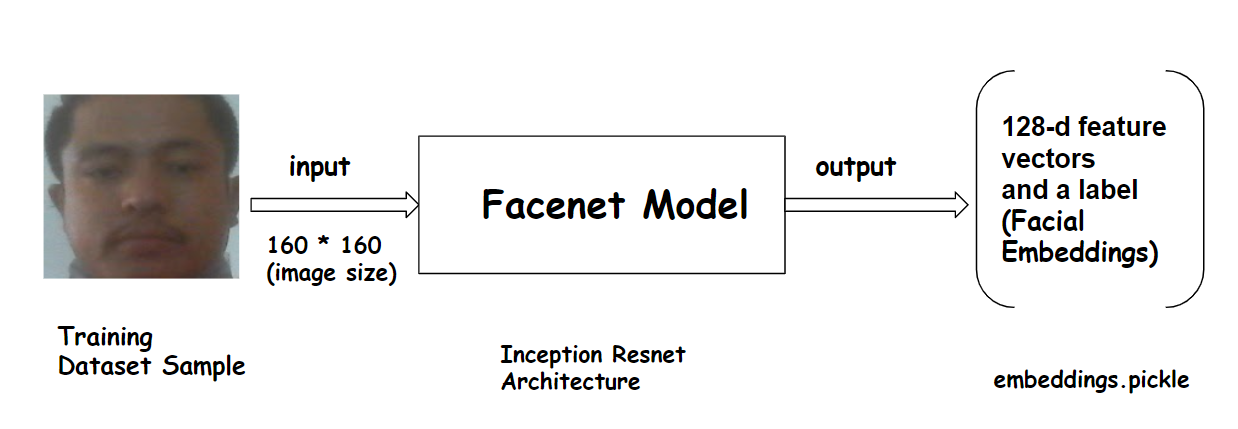
The training is done by using a two way process. In the first process, the facial embeddings are extracted from a FaceNet model which uses triplet loss to output a 128-d feature vector called an embedding. Then, in the second process, we train a SVM classifier to a list of embeddings to create a recognition model.
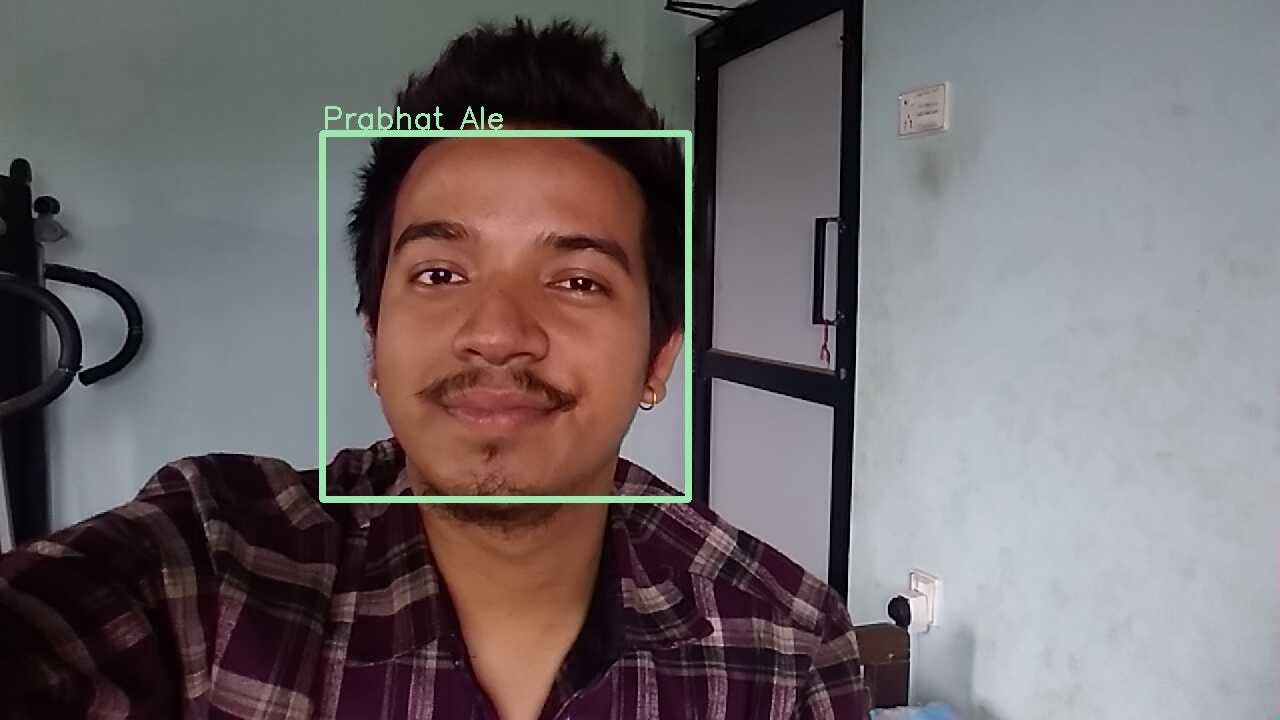
In the testing phase, the person faces the webcamera for doing their attendance. The system detects the face, crops the facial region and resized the face image into 160 * 160 pixel. Then the resized face is provided as an input to the facenet model which outputs a 128-d feature vectors. Then this 128-d feature vector is provided as an input to the recognizer model which recognizes the identity of that person and mark their attendance as present.
The whole system is divided into following stages as given below:-
1. Registration Phase
This is the first phase in our system in which the registration of an employee takes place. The steps involved in the registration phase are as follows:
- The user inputs his full name through the command line interface.
- Initialization of web camera : After taking user inputs, the web camera is intialized.
- Portrait acquistion of user : Then the portrait acquisition of each user is done by using a web camera to capture 50 images.
- Face Detection : On each captured image, we apply face detection algorithm and draw a rectangular bounding box at the detected facial region. Here, we have used OpenCV haarcascade classifier for face detection.
- Image Resizing : After face detection, the detected facial region are extracted and then resized into 160 * 160 pixels because the FaceNet model requires the input dimensions to be 160 * 160 pixels.
- Storing images in a local directory : Finally, those resized face images are stored in a local database under the directory with the name of a user.
This completes the registration phase and here is the diagram representing the image acquistion and the registration process:

Here is the working code sample written in Python that performs all the steps necessary for registering the user and storing their images under the directory with the name of a user.
register.py
import cv2
import numpy as np
import os
face_cascade = cv2.CascadeClassifier("models/haarcascade_frontalface_default.xml")
root_dir = os.getcwd()
dataset_dir = os.path.join(root_dir,'dataset')
name = input("Enter your name: ")
input_directory = os.path.join(dataset_dir,name)
if not os.path.exists(input_directory):
    os.makedirs(input_directory, exist_ok = 'True')
    count = 1
    print("[INFO] starting video stream...")
    video_capture = cv2.VideoCapture(0)
    while count <= 50:
        try:
            check, frame = video_capture.read()
            gray = cv2.cvtColor(frame,cv2.COLOR_BGR2GRAY)
            faces = face_cascade.detectMultiScale(gray,1.3,5)
            for (x,y,w,h) in faces:
                face = frame[y-5:y+h+5,x-5:x+w+5]
                resized_face = cv2.resize(face,(160,160))
                cv2.imwrite(os.path.join(input_directory,name + str(count) + '.jpg'),resized_face)
                cv2.rectangle(frame, (x,y), (x+w, y+h),(0,0,255), 2)
                count += 1
            # show the output frame
            cv2.imshow("Frame",frame)
            key = cv2.waitKey(1)
            if key == ord('q'):
                break
        except Exception as e:
            pass
    video_capture.release()
    cv2.destroyAllWindows()
else:
    print("Photo already added for this user..Please provide another name for storing datasets")
For running this file, you just go to the terminal, and then use the following command:
python register.py
2. Training Phase
In training phase, the training datasets is provided as inputs to the pretrained facenet model for extracting a list of 128-d feature vectors called facial embeddings. Here,a list of 128-d feature vectors act as features and the names of person act as a label. Then we train a machine learning algorithm by using supervised machine learning approach on those features and labels to create a recognizer model. The training phase is divided into further two stages:-
2.1 Extraction Of Face Embeddings
After the creation of a facial database, the training datasets are provided as inputs to the pretrained FaceNet model for extracting a list of 128-d feature vectors called embeddings. The distance between 128-d feature vectors of the same person is smaller whereas this distance is larger for faces of different persons. The pretrained weight file of a FaceNet model is available under the ‘models’ directory. After the embeddings are extracted successfully, we serialized 128-d feature vectors along with their associated class name in our embeddings model and saved the serialized format to a file named ‘embeddings.pickle’ under the models directory.
models
|—– facenet.h5
| — — — embeddings.pickle
Here, ‘facenet.h5’ is a pretrained FaceNet model and ‘embeddings.pickle’ is a pickle object of our serialized embeddings model.
The below code sample accepts the resized training images as an input which is then forwarded to the facenet model for extracting 128-d feature vectors called labels.
extract_embeddings.py
import cv2
import os
import numpy as np
from tensorflow.keras.models import load_model
import pickle
rootdir = os.getcwd()
dataset_dir = os.path.join(rootdir,'dataset')
model_path = os.path.join(rootdir,'models/facenet_keras.h5')
facenet_model = load_model(model_path)
categories = os.listdir(dataset_dir)
def check_pretrained_file(embeddings_model):
	data = pickle.loads(open(embeddings_model,"rb").read())
	names = np.array(data["names"])
	unique_names = np.unique(names).tolist()
	return [data,unique_names]
def get_remaining_names(unique_names):
	remaining_names = np.setdiff1d(categories,unique_names).tolist()
	return remaining_names
def get_all_face_pixels():
	image_ids = []
	image_paths = []
	image_arrays = []
	names = []
	for category in categories:
		path = os.path.join(dataset_dir,category)
		for img in os.listdir(path):
			img_array = cv2.imread(os.path.join(path,img))
			image_paths.append(os.path.join(path,img))
			image_ids.append(img)
			image_arrays.append(img_array)
			names.append(category)
	return [image_ids,image_paths,image_arrays,names]
def get_remaining_face_pixels(remaining_names):
	image_ids = []
	image_paths = []
	image_arrays = []
	names = []
	face_ids = []
	if len(remaining_names) != 0:
		for category in remaining_names:
			path = os.path.join(dataset_dir,category)
			for img in os.listdir(path):
				img_array = cv2.imread(os.path.join(path,img))
				image_paths.append(os.path.join(path,img))
				image_ids.append(img)
				image_arrays.append(img_array)
				names.append(category)
		return [image_ids,image_paths,image_arrays,names]
	else:
		return None
def normalize_pixels(imagearrays):
	face_pixels = np.array(imagearrays)
	# scale pixel values
	face_pixels = face_pixels.astype('float32')
	# standardize pixel values across channels (global)
	mean, std = face_pixels.mean(), face_pixels.std()
	face_pixels = (face_pixels - mean) / std
	return face_pixels
embeddings_model_file = os.path.join(rootdir,"models/embeddings.pickle")
if not os.path.exists(embeddings_model_file):
	[image_ids,image_paths,image_arrays,names] = get_all_face_pixels()
	face_pixels = normalize_pixels(imagearrays = image_arrays)
	embeddings = []
	for (i,face_pixel) in enumerate(face_pixels):
		sample = np.expand_dims(face_pixel,axis=0)
		embedding = facenet_model.predict(sample)
		new_embedding = embedding.reshape(-1)
		embeddings.append(new_embedding)
		data = {"paths":image_paths, "names":names,"imageIDs":image_ids,"embeddings":embeddings}
	f = open('models/embeddings.pickle' , "wb")
	f.write(pickle.dumps(data))
	f.close()
else:
	[old_data,unique_names] = check_pretrained_file(embeddings_model_file)
	remaining_names = get_remaining_names(unique_names)
	data = get_remaining_face_pixels(remaining_names)
	if data != None:
		[image_ids,image_paths,image_arrays,names] = data
		face_pixels = normalize_pixels(imagearrays = image_arrays)
		embeddings = []
		for (i,face_pixel) in enumerate(face_pixels):
			sample = np.expand_dims(face_pixel,axis=0)
			embedding = facenet_model.predict(sample)
			new_embedding = embedding.reshape(-1)
			embeddings.append(new_embedding)
		new_data = {"paths":image_paths, "names":names,"imageIDs":image_ids,"embeddings":embeddings}
		combined_data = {"paths":[],"names":[],"face_ids":[],"imageIDs":[],"embeddings":[]}
		combined_data["paths"] = old_data["paths"] + new_data["paths"]
		combined_data["names"] = old_data["names"] + new_data["names"]
		combined_data["face_ids"] = old_data["face_ids"] + new_data["face_ids"]
		combined_data["imageIDs"] = old_data["imageIDs"] + new_data["imageIDs"]
		combined_data["embeddings"] = old_data["embeddings"] + new_data["embeddings"]
		f = open('models/embeddings.pickle' , "wb")
		f.write(pickle.dumps(combined_data))
		f.close()
	else:
		print("No new data found... Embeddings has already extracted for this user")
2.2 Training SVM Algorithm
After the extraction of embeddings, the list of embeddings are trained by using a SVM algorithm to create a recognition model. First, we need to load ‘embeddings.pickle’ file and deserialize it to get a list of embeddings and a list of classes associated with each embedding. Then a list of embeddings are treated as features and a list of classes are treated as labels. Then we train a SVM algorithm on known features and labels to create a model that can predict a label when given a 128-d feature vector. After the training is completed, a recognizer model is created which is serialized and saves the serialized format to a file named ‘recognizer.pickle’ under the models directory. Later we can load this file and deserialize this model and use it during the testing phase for automatically marking the attendance.
models
| — — — recognizer.pickle

train.py
"""
Train ML Model to Classify / Identify the person using extracted face embeddings
"""
from sklearn.preprocessing import LabelEncoder
from sklearn.svm import LinearSVC
import pickle
import numpy as np
import os
from sklearn.calibration import CalibratedClassifierCV
rootdir = os.getcwd()
embeddings_path = os.path.join(rootdir,'models/embeddings.pickle')
def load_embeddings_and_labels():
    data = pickle.loads(open(embeddings_path, "rb").read())
    # encoding labels by names
    label = LabelEncoder()
    names = np.array(data["names"])
    labels = label.fit_transform(names)
    # getting names
    # getting embeddings
    Embeddings = np.array(data["embeddings"])
    return [label,labels,Embeddings,names]
def create_svm_model(labels,embeddings):
    model_svc = LinearSVC()
    recognizer = CalibratedClassifierCV(model_svc)
    recognizer.fit(embeddings,labels)
    return recognizer
[label,labels,Embeddings,names] = load_embeddings_and_labels()
recognizer = create_svm_model(labels=labels,embeddings=Embeddings)
f1 = open('models/recognizer.pickle', "wb")
f1.write(pickle.dumps(recognizer))
f1.close()
print("Training done successfully")
3. Attendance Updation
After the face recognition process, the face of staff is recognized and their attendance is marked in the attendance report and the rest will be marked as absent. The list of absentees will be mailed to the respective staff. The attendance sheet is maintained in a CSV format where the name of staff, date, and their attendance status are recorded along with the timestamp of their attendance period. The attendance taking time interval is fixed (say between 10 to 11 am) and the staff must mark their attendance during that time interval. If the staff are unable to mark their attendance during that time interval, their attendance status is marked as absent and an email notification is sent to them regarding their attendance status. The attendance sheet is automatically generated by the system which is named ‘attendance.csv’ and stored under the ‘reports’ directory.
reports
| — — — attendance.csv
mark_attendance.py
import csv
class Mark_Attendance:
    def __init__(self,csv_filename):
        self.csv_filename = csv_filename

    def write_csv_header(self,staff_name,date,time,status):
        self.date = date
        self.staff_name = staff_name
        self.time = time
        self.status = status
        f = open(self.csv_filename, "w+",newline='')
        writer = csv.DictWriter(f, fieldnames=[self.staff_name,self.date,self.time,self.status])
        writer.writeheader()
        f.close()
    def append_csv_rows(self,records):
        self.records = records
        with open(self.csv_filename, 'a+',newline='') as f_object:
            # Pass this file object to csv.writer()
            # and get a writer object
            writer_object = csv.writer(f_object)

            # Pass the list as an argument into
            # the writerow()
            writer_object.writerow(self.records)

            #Close the file object
            f_object.close()
recognize.py
import csv
class Mark_Attendance:
    def __init__(self,csv_filename):
        self.csv_filename = csv_filename

    def write_csv_header(self,staff_name,date,time,status):
        self.date = date
        self.staff_name = staff_name
        self.time = time
        self.status = status
        f = open(self.csv_filename, "w+",newline='')
        writer = csv.DictWriter(f, fieldnames=[self.staff_name,self.date,self.time,self.status])
        writer.writeheader()
        f.close()
    def append_csv_rows(self,records):
        self.records = records
        with open(self.csv_filename, 'a+',newline='') as f_object:
            # Pass this file object to csv.writer()
            # and get a writer object
            writer_object = csv.writer(f_object)

            # Pass the list as an argument into
            # the writerow()
            writer_object.writerow(self.records)

            #Close the file object
            f_object.close()
Conclusion
I hope you were able to follow along and was able to build the system successfully.
To download the source code to this post, Get the code on Github
If you have any questions, recommendations, or critiques, I can be reached via LinkedIn. Feel free to reach out to me.
FAQ
What is Face Recognition?
Face Recognition is a method of identifying an individual by comparing their faces with the stored faces in the database
What is Face Recognition based attendance system?
Face Recognition based attendance system is a system that automatically marks the attendance of present employee by recognizing the face of an employee.
Why do we need Face Recognition based attendance system ?
Traditional methods of attendance are time and effort consuming. In big organizations where many staff are employed it’s hard to perform attendance manually and there may be chances of misplacement of attendance sheets leading to inaccurate and inefficient attendance. Employees can easily get rid of time recording options by committing time theft in manual based attendance systems. So, we need Face Recognition based attendance system for not only automating the attendance process but also preventing the employees from commiting time thefts.
Which algorithm is used in the face recognition attendance system?
Face recognition is done in a two way process :- Extraction of face embeddings and Training SVM algorithm. We use FaceNet algorithm for extracting 128-d face embeddings. FaceNet maps each face image into 128-d feature vectors such that the the squared distance between two embeddings of the same person is small, whereas the squared distance between two embeddings of different person is large.Then we can train SVM algorithm on those 128-d face embeddings to create a recognizer model.
Where is Face Recognition used ?
Everyday, we look into our phones thousands of times and end up using face recognition technology for unlocking our phones. Facebook uses it’s own face recognition algorithm for recognizing you and your friends. China has created a vast surveillance system equipped with facial recognition technology to monitor it’s citizens. Similarly, the FBI uses facial recognition to spot criminals.
How FaceId Works ?
Face Verification is done in setting up FaceId in smartphones. Imagine you own an Iphone and you want to use Faceid to unlock your phone. First, you need to setup your faceid by capturing your face image at all possible angles. Then the system stores that faces in a database and finally, it verifies you and unlocks your phone by comparing your faces with the stored faces in the database.